Welcome to my blog!

Welcome Friends! Please be patient while I add more info. I have SO much to share with you. Thanks for visiting!
Showing posts with label Beginner Crochet Patterns. Show all posts

Tuesday, February 21, 2023

Ribbon Scrunchy - Free Beginner Crochet Pattern

 Skill level: Beginner

Ribbon Scrunchy - Free Beginner Pattern

This scrunchie is very simple to make, but the satiny ribbon makes it special. Single crochets are spread around the entire band. Make several in cheerful, bright colors for a different look.

Materials

2 spools Offray Ribbon, 1/8” wide, 10 yds each spool - 20 yds total ribbon. Substitute any yarn

1 Elastic round Hair band -about 2” in diameter 

Crochet Hook- size F/ 5 (3.75mm)

Instructions

Rnd 1: Attach ribbon to band with s s, ch 1, work sc around band, making sure entire band is covered, s s to first sc.

Rnd 2: Ch 1, work 2 sc in each sc around, attach with s s to first sc. 

Rnd 3: Ch 1, work 2 sc in each sc, but work 3 sc in every 4th sc, as follows:

2, 2, 2, 2, 3, 2, 2, 2, 2, 3, etc.

Attach with s s to beg sc, end off.


Thursday, October 6, 2022

Knit Look Free Crochet Cowl Pattern

Knit Look Beginner
Free Crochet Cowl Pattern
By
May Jane Hall

Description 

This is a beginner project that's quick and easy. If you'd rather have a long scarf that's not circular like an infinity scarf, just work enough chains at the beginning to the length you want your scarf to be, then work the entire scarf in rows (not rounds) turning each row to get the ridged effect. Don't forget to work all rows in the back loop only. You will be working all half double crochet stitches (hdc) after your beginning chain, and in my opinion working a hdc in the blo is what makes this stitch look like knitting. 

Tip - you can use a smaller hook than size M, but keep in mind if you do use a smaller hook, your scarf will not be as drapeable and will be stiffer. The loser you crochet with a larger hook, the softer your scarf will be.

Finished Size - I made this for a friend and didn't measure it because at the time I didn't know I was going to offer the cowl as a free pattern. 

Materials

Vannas Choice yarn: #4, worsted wt yarn in color: Barley

Note: any worsted (or Aran) wt yarn can be used for this pattern. You can use a smaller yarn and smaller hook, such as #2 sport wt, #3 DK wt, but keep in mind that you'll need to crochet more foundation stitches at the beginning to make it longer if you do this. You could even use a bulky yarn but would need to make less foundation sts. 

Crochet Hook: size M/13 (9mm)

Gauge: I made this as a gift for a friend and did not measure the gauge before I gave it to her. Even though your gauge is very important when making garments, it's not all that important when making a scarf. That is, unless you want it to look identical to the one the pattern was written for. Something to keep in mind is that I always use a larger hook than what the company suggests on the yarn label. You do not want your crochet items to be hard and stiff unless it's a purse or a molded hat. 

Stitches used: Chain (ch), slip stitch (sl st), half double crochet (hdc)

Abbreviations: 

Blo - back loop only

Ch - chain

Hdc - half double crochet

Rep - repeat

Rnd - round

Sl st - slip stitch

St - stitch

Pattern notes: all rounds are worked in the blo (back loop only) to get the ridged effect. You will be slip stitching the last st to the first st on each end. (Unless you make 1 long scarf that's not in the round). Then you'll turn each round. If you don't turn the rnds, you won't get the ridged effect. Ch 2 at the beginning of each round.

Knit Look Crochet Cowl 
Free Beginner Pattern by
Mary Jane Hal

Instructions

Foundation row: Ch 144 , being careful not to twist ch, sl st to 1st ch (circle made)

Rnd 1: ch 2, work hdc in blo of each ch, sl st to first st, turn- 144 hdc

Note: in order to make the raised ridges, you have to turn each round/row, and work in the back loop only (blo) of each stitch (hdc), otherwise your stitches will all be flat.

Rnds 2 - ___: Rep rnd 1 until you get the desired width of the cowl. (Sorry I did not count these rows either, before I gave this cowl to my friend!)

End off yarn and weave in all loose ends. 

PLEASE LET ME KNOW IF YOU HAVE QUESTIONS!

Important: Remember, if you want your friends to know about this pattern or post about it, you'll need to post a link on your blog to have them come to this blog. You're not allowed to copy the text and put the pattern on your blog. Because if you post my pattern on your blog it's considered stealing. Please follow the copyright laws. One of the reasons to offer free patterns is so I can promote my crochet books that are sold on Amazon. I still receive royalties from the sale of my books and this is part of the way I make my living. So posting my patterns on your blog or anywhere else takes away from my income.  


Thursday, April 30, 2020

Bohemian Style Purse - Free Crochet Patten

Bohemian Style Purse
Free Crochet Pattern by
Mary Jane Hall


This Bohemian Style Shoulderbag (see pattern below) is another one of the patterns I created for Hobby Lobby a few years ago. These  were given as a free pattern to customers, hoping they would purchase the Hobby Lobby yarn I used to create the design. Really, you could use just about any yarn to make this purse, but keep in mind,  if you are a beginner, using a smaller weight yarn than this bulky yarn I used would make a smaller purse. Or if you want a larger bag than this, you could use extra bulky yarn or even work the pattern with 2 strands of yarn together.

This is a super easy beginner pattern, and the tassels make it fun! Actually it reminds me of the purses from the 70's. Or if you want to make it look more like a colorful "Hippie Bag", it would be cool to crochet each row (or round) in a different vibrant color!

I probably would not have chosen a fuzzy yarn for this, but I had to come up with designs using  yarns Hobby Lobby headquarters sent me. Most of the yarn they sent was furry or fuzzy. I figured they wanted to showcase yarns that weren't selling as well.

I did 7 designs for their tear sheets and at one time Hobby Lobby had all the free patterns online, but they no longer have those posted. So that's why I am adding the free pattern here. The bag is worked in the round, having less seams to sew. Hopefully you will
be able to print this pattern. 

This pattern is copyrighted, so please do not sell the pattern. You are welcome to sell your projects made from this pattern.


Saturday, April 27, 2019

Emoji Coffee Sleeve II - Free Crochet Pattern

This Emoji Coffee Sleeve pattern is made different than the first one. The Smily faced one uses hdc stitches and has a Picot border, but this one is all sc rows, making it easier than the first one. It does not have the picot border. 


Coffee Sleeve with Laughing Emoji Patch - Free Crochet Pattern by Mary Jane Hall

I have at least 22 patterns for Coffee Sleeves and Coffee Cozies that I want to share with you. They will be free and all I ask is that you do not sell my patterns. If you share them please make sure you give me credit as the designer.  It's perfectly fine if you want to make any of my patterns and sell the item.
The written patterns are not very long and these should be a perfect project for a beginner.  I let other things get in the way of posting these patterns but I promise I will try to add one every few days.
Coffee Sleeves can also be considered a Coffee Cozy as far as the name, but the Sleeve is more like something you put on a paper cup such as one from Starbucks or McDonalds. You slip it on at the bottom of the paper cup.
But if you want a cozy for a mug, that's a little different. You can't put a Coffee Sleeve on a mug that has a handle. So I have different patterns for what I call a "Mug Cozy".
This pattern is a Coffee Sleeve that slips on the bottom of a paper coffee cup.

Light Teal Coffee Sleeve with Emoji Patch

Materials
Hook Size
US- G/6
UK - 8
Metric - 4.00mm

Yarn
Red Heart Soft Yarn
Color - teal or any other #4 worsted weight yarn. If using a thicker yarn you will have less stitches in each round. If using thinner yarn you will have more stitches in each round.
Emoji Patch or Applique (can be bought at Hobby Lobby or ordered from eBay, etsy or Amazon)
Starbucks paper cup

Note: if sleeve is too loose after the first round or 2, you may have to chain less at the beginning (28 instead of 30) or you can use a smaller hook. 

Instructions
All rows are sc (single crochet)
You will need to slip the Sleeve onto the cup after the second row to see how it fits. You may crochet tighter or loser than I do so that's why you need to try it on. This is easy enough for a beginner and it's not difficult to tighten up your stitches or use a smaller hook if the cozy is too loose on the cup. It's better to make it a little tight, because it will probably stretch from use.

Chain 28
Round 1: Sc in 2nd chain from hook and in each chain to the end - 27 sc
Being careful not to twist chain, slip stitch into first stitch forming a ring. Do not turn. You will continue working in the round.
Note: put the sleeve on the cup to make sure it's not too loose. Do this after every coupler of rows.
Rounds 2-11: sc in first sc of round and in each sc around, slip stitch to first sc - 27 sc
Note: by the end of the 2nd or 3rd round you should be able to keep working without joining with a slip stitch.
After last round, end off, making sure the yarn is long enough to weave in.

Friday, April 26, 2019

Emoji Coffee Sleeve 1 - Free Crochet Pattern

This is a cute, quick little crochet project for a beginner! It would be a nice gift. You can find patches (or appliques) at craft stores or places like eBay, etsy and Amazon. The possibilities are endless!


Smily Face Emoji Coffee Sleeve with Picor Edging- free pattern by Mary Jane Hall

Materials
Hook Size (for pink hdc rnds)
US- H/8
UK - 6
Metric - 5.00
Hook Size (for black picot edging)
Us - B/1
UK - 13
Metric - 2.25

Yarn
(A) Impecable Loops and Threads Yarn by Michael's
Color - Rich Orchid, color # 01404, or any other #4 worsted weight yarn. If using a thicker yarn you will have less stitches in each round. If using thinner yarn you will have more stitches in each round.
(B) Black Picot Trim - #3 crochet cotton thread by Aunt Lydias

Smiley Face patch (or applique). Link to several patches on eBay. You can also find patches at craft stores like Hobby Lobby.
Starbucks paper coffee cup

Picot- ch 2,  sl st in first chain

Note: if sleeve is too loose after the first round or 2, you may have to chain less at the beginning (28 instead of 30) or you can use a smaller hook. 

Instructions
Chain 30, being careful not to twist chain, join with slip stitch to first chain. Do not turn work. 
Rnd 1: hdc in same sp as join, and in each chain around, slip stitch to first hdc. 
Rnd 2: hdc in same space as join and in each hdc around,  join to first hdc with sl st. Put piece onto paper coffee cup to see if it will be too tight or too lose. If not, continue. It's better to be a little tight than loose, because it will stretch with use.
Rnds 2-9: continue working hdc rounds, putting sleeve on cup after every few rows, making sure it's not too loose. By the 2nd or 3rd rnd  you can continue to work rows without joining the end of each rnd. Just work right over top of the last join. Doing it this way with make it looks much better because it will be seamless. 
After rnd 9, end off yarn. 

Picot Edging
Attach black thread to any hdc with slip knot. Chain 1, sc in first hdc, work Picot, (see above); continue working (sc, Picot) in each remaining hdc, join with sl st to first sc, end off yarn and repeat this on other edge. 
Weave in ends. 

Thursday, February 28, 2019

Coffee Sleeve with Fur Trim - Free Crochet Beginner Pattern

I have at least 22 patterns for Coffee Sleeves and Coffee Cozies that I want to share with you. They will be free and all I ask is that you do not sell my patterns. If you share them please make sure you give me credit as the designer.  It's perfectly fine if you want to make any of my patterns and sell the item.
The written patterns are not very long and these should be a perfect project for a beginner.  I let other things get in the way of posting these patterns but I promise I will try to add one every few days.

Coffee Sleeve with Fun Fur Trim - free crochet beginner pattern
by Mary Jane Hall

Coffee Sleeves can also be considered a Coffee Cozy as far as the name, but the Sleeve is more like something you put on a paper cup such as one from Starbucks or McDonalds. You slip it on at the bottom of the paper cup.
But if you want a cozy for a mug, that's a little different. You can't put a Coffee Sleeve on a mug that has a handle. So I have different patterns for what I call a "Mug Cozy".
This first pattern is a Coffee Sleeve that slips on the bottom of a paper coffee cup.

Purple Coffee Sleeve with Fur Trim

Materials
Hook Size
US- G/6
UK - 8
Metric - 4.00mm

Yarn
(A) Red Heart Soft Yarn
Color -purple, or any other #4 worsted weight yarn. If using a thicker yarn you will have less stitches in each round. If using thinner yarn you will have more stitches in each round.
(B) Fun Fur or Eyelash yarn - purple

Starbucks paper cup

Instructions
All rows are sc (single crochet)
You will need to slip the Sleeve onto the cup after the second row to see how it fits. You may crochet tighter or loser than I do so that's why you need to try it on. Sorry I didn't write down a gauge with this pattern before I sold it at the craft fair! But this is easy enough for a beginner and it's not difficult to tighten up your stitches or use a smaller hook if the cozy is too loose on the cup. It's better to make it a little tight, because it will probably stretch from use.

Chain 28
Round 1: with yarn (A), Sc in 2nd chain from hook and in each chain to the end - 27 sc
Being careful not to twist chain, slip stitch into first stitch forming a ring. Do not turn. You will continue working in the round.
Rounds 2-11: sc in first sc of round and in each sc around, slip stitch to first sc - 27 sc
Note: by the end of the 2nd or 3rd round you should be able to keep working without the slip stitch.
After last round, end off, making sure the yarn is long enough to weave in.

Trim (B)
Make a slip knot and attach fun fur to any sc at top edge of sleeve. Sc in same space and in each sc around. Slip stitch to first sc, end off and weave in ends.

Thursday, October 11, 2018

Peek A Boo Crochet Shrug and Hat

My Peek  Boo Shrug Design published in Kim Werker's Book, Get Hooked Again.
See link to FREE hat pattern below.

Many of you have probably heard of Kim Werker, who actually started the famous blog she called "Crochet Me". There are  many free patterns  posted, as well as paid patterns and all kinds of info about
crochet. After a few years she retired from that blog and it is now run by Interweave Crochet. 

 But years before she retired, Kim wrote her book Let's Get Hooked, which was geared 
more for young women. The designs would actually appeal more to teenagers. Then later, she decided to do Get Hooked Again! and she opened it up to other designers. So I submitted this shrug and skull cap and she accepted both for the book. There wasn't enough room in the book for the hat, so the free pattern  for my hat is Here


Free Crochet Pattern
Peek A Boo Hat by 
Mary Jane Hall

Tuesday, June 5, 2018

Zig Zag Striped Scarf - Free Crochet Pattern


Zig Zag Striped Scarf by Mary Jane Hall - Free Crochet Pattern

Back in 2006, not long after I had started designing professionally, a rep from Hobby Lobby contacted me, asking if I'd be interested in coming up with some original designs, using their yarn. The patterns would be in the form of "tear sheets". These are the free patterns you see in their stores. They offer them hoping you will use their yarn, which, by the way, is wonderful and high quality at an affortable price.  Other stores, such as Michaels and JoAnn Fabrics, do the same thing.  Of course I was thrilled and honored they considered me for this job.

I ended up doing a total of 7 designs using their beautiful yarns. That was such a fun time, as they would send me large boxes of different types of yarn, in many colors. Even though these were fun projects for me to do, many times I wished I could just go to the store and pick out other yarns with their "Yarn Bee" label, that I wanted to work with.

My patterns in the form of tear sheets are no longer in their 400+ stores across the nation, but for years you could find them there and on their website. I am not even sure if my patterns are at their site anymore, but I  found this one and will share it with you here.
You can substitute the yarn I used with any yarn of your choice. The yarn weight, your gauge and hook size do not matter when you're making a scarf. You can make it bulky or light weight and delicate. And if you want to make a "wrap" from this pattern, all you have to do is keep adding rows.

I hope you enjoy my pattern! If you share it, please link it back to me here, also giving me credit as the designer! Mary Jane Hall


Zig Zag Striped Scarf by Mary Jane Hall - Free Crochet Pattern


Saturday, September 5, 2015

Preppy Stripes Scarf - Free Beginner Crochet Pattern

This scarf was published in 2005 in one of my booklets called Crochet in Style by Kooler Designs Studio. Leisure Arts partnered with them as the publisher. The booklet is out of print now but can still be purchased on Amazon, eBay and at Kooler Design Studios here. Other projects in the book include Loops 'n Loops Scarf, Pink Filigree Capelet (sold on this blog as 1 individual psttern), Fabulous Fishnet Poncho, Fluffy Flowers Scarf and Circle Fringe Scarf.

Preppy Stripes Scarf by Mary Jane Hall


They told me that after 1 year the designs in the booklet would revert back to me and I could sell them in any way I wanted. I am offering this scarf as a FREE design here on my blog. It's perfect for a beginner! By the way skinny scarves were popular back in 2005 - 2006, but then phased out. I can now say that in 2015, I'm seeing all kinds of very skinny, long scarves on the runways!

I will post the free pattern later today when I get on my laptop and will do that this evening sincd I dont have the patern on my table that Im woring from right now. Please let me know you need the pattern in case I forget!

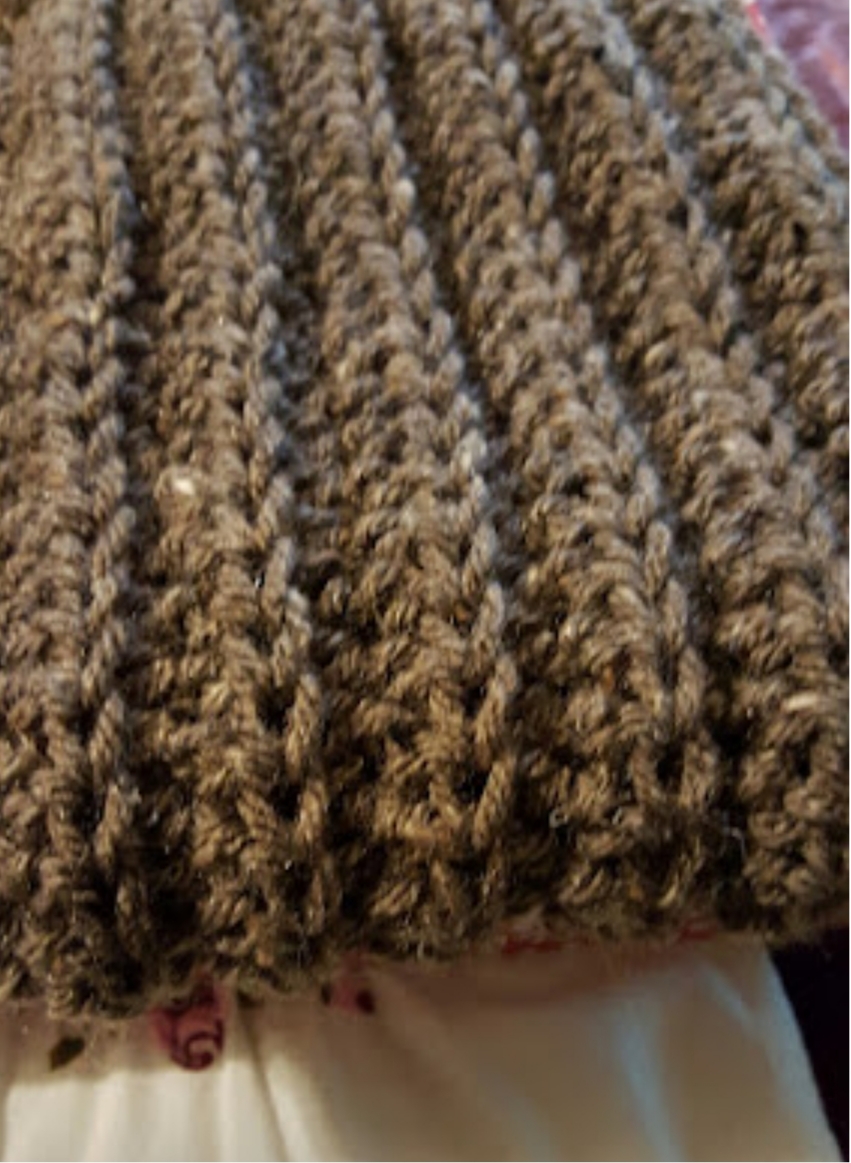
Please overlook the photo! I just took a picture of the photo that was in the book with my phone. I gave that scarf 10 years ago to my daughter and I'm sure it's really old by now or I would be glad to take a better picture. Normally, I take my own pictures of my designs before sending them to the publisher, but they need these designs so quickly that they wanted me to overnight them! I'll see if my daughter still has that scarf!


Preppy Stripes Scarf by Mary Jane Hall


Finished Size: approx 3" x 84"
Skill Level: Beginner


Materials
Medium Worsted Weight Yarn - # 4
    Beige (A) - 2 ounces/ 113 yards / 66 grams / 103 meters
    Rust (B) - 2 ounces / 177 yards / 57 grams / 162 meters
    Olive Green (C) - 2 ounces / 127 yards / 57 grams / 117 meters
    Dark Brown (D) - 2 ounces / 113 yards / 57 grams / 103 meters
Size K / 10 1/2 (6.5 mm) Crochet Hook


Gauge (in pattern)
7 sc and 5 rows = 2"


Color Sequence
Beige (A), Rust (B), Olive Green (C), Dark Brown (D)


Note: When changing yarn at end of row, pull new color through last 2 loops of last sc. Ch 1, turn. Start next row with new color. It can be a little tricky to hide the colors when weaving in the ends at the side edges. As you can see from my picture, some of the colors show on the sides.


Options
If you do not like working in the back loop only (blo), you can work regular sc or DC , working in both loops. Remember that working in the back loop only creates the ridge, but it also makes the scarf stretch. You may want to shorten the scarf, by working less rows than the pattern calls for.


Instructions
With D, Ch 11 loosely.
Row 1: SC in 2nd chain and in each chain across. Chain 1, turn.
Rows 2- 5: Sc in back loop of each sc across. Ch 1, turn.
Rows 6 - 10: With A repeat row 2
Rows 11- 15: With B repeat row 2
Rows 16 - 20: With C repeat row 2
Rows 21 - 25: With D repeat row 2
Rows 26 - 185: Repeat rows 6 - 25 eight times. Fasten off and weave in loose ends.


Note: If your stitches are loose it would be a good idea to use a fabric glue or OK TO WASH IT to keep ends from coming out. You can buy this fabric glue at JoAnn Fabric and Crafts, Hancock Fabrics or Hobby Lobby. It is especially important to use this if your stitches are loose, but if your stitches are  tight, you may not need to use it.


Fringe
Use forty 24" strands of beige yarn. Attach evenly across both ends of scarf, using 2 strands for each fringe. Fold strands in half, hook folded ends around hook, and pull through scarf; insert strands into loop pulled through and pull gently to tighten. 

Wednesday, September 2, 2015

Walk in the Park Capelet from Colorful Crochet Lace

This is my own photo. I meant for it to be worn like this. See the photos the publisher put in the book below. They have it more scrunched up like a collar. 
The Walk in the Park Capelet is the smallest and easiest project in Colorful Crochet Lace. This is a beginner project with only chs, sc & dc, which would be great as a CAL project for a beginner's class. I wrote the pattern for sizes small - 3X and the yarn is Patons Grace, a 100% cotton. This is a # 3 dk wt in the color viola.

You can make this longer by adding rows and if you want it wider, add extra chains between the dc shells. To see more details and all the projects in the book go to my Ravelry Designer page HERE.

By the way, don't you just love the photos in this book? The very talented photographer is Joe Hancock.


Walk in the Park Capelet by Mary Jane Hall in Colorful Crochet Lace

Walk in the Park Capelet by Mary Jane Hall in Colorful Crochet Lace

A Ravello User Made This! I love the color and this shows how
it looks with thicker yarn


Thursday, April 2, 2015

Free Crochet Sock Pattern for Beginners


Free Beginner Crochet Sock Pattern by Mary Jane Hall

Update: please see my notes at the end of this post before making the socks. It is very important.

The sock pattern I have written is for women's sizes 4-12 (shoe size) and men's shoe sizes 6-14. There are several pages to this pattern because I wanted to explain my Graduated Stitch Method of making shaped garments and accessories without using increases or decreases. I talk about how I introduced this method in Crochet That Fits and give lots of tips and have several photos as well, making the pattern easy to undrstand. Don't allow the number of pages to scare you! This is a beginner pattern and I want to be clear on the instructions. I think it will be pretty awesome for those who have always thought socks would be way too difficult to do.  I'm excited to hear your feedback and by all means please post a photo of your finished socks on Ravelry and connect to me as the designer.
Gorgeous Silk Yarn - Panda Silk by Crystal Palace

Important Notes you need to know before making the socks


Ignore the numbers at the end of row 1 (after it says "turn". That is not another row. I'm simply stating how many stitches you should have on that row. I should have just stated "155 total stitches on Row 1" or whatever the number is. It's been confusing to some people. I can only find my PDF copy and can't edit that, so have been looking for my original pattern for the socks. In the meantime just ignore the numbers at the end of each row and everything should be ok. Sorry if it confused anyone. I was really trying to make it easier for beginners, but it ended up confusing even more experienced crocheters. Just a note for in the future - when there is a dash and numbers at the end of a row (with any crochet pattern) that is the "total" number of stitches in that row.


I will also remind everyone that I am giving you permission to make and sell your finished product, but if you do sell anything of mine on etsy, craftsy, ebay, revelry, your blog, or any other place, you need to mention my name as the designer, so I will get the credit. Mentioning my name helps to promote me and my designs/books, therefore helping my income. There are people at the moment selling projects from my designs and have not mentioned my name, which makes it look like they are the designer. This is hurtful and just not right.

Also, remember that it is illegal to post my written pattern on the internet, so please be mindful of this. People have found my entire written patterns that are in my books, posted on websites in other countries and the publisher has had to contact them. This takes away sales from the book and has been a problem for other designers as well.

Thank you all for understanding and for being patient!
The downloadable pattern in PDF form is here.

Monday, March 4, 2013

Newborn Mountain Hat with Earflaps - Free Crochet Pattrrn


       Design by Mary Jane Hall

Description: It’s hard to find such a cute hat in a newborn size, and it will turn heads for sure! For a larger size hat, use a larger hook or bulky yarn using these instructions. If you want to make the hat in a smaller size to fit an American Girl Doll, you can use a smaller yarn such as a sport wt and a smaller hook.

I'm happy to share my pattern with you, but you aren't allowed to sell this written pattern or make the hat and claim it as your own Design. Of course you can make the hat and sell the actual project. It's not required but it would be courteous of you to mention my name as the designer to give me credit. Doing this will make me even more happy to give free patterns that will bring crocheters to my blog.  Thank you for respecting the copyright laws. Also, you aren't allowed to post the actual pattern on your blog or website but you can post a picture of the hat and link on you blog to direct people to this pattern, mentioning my name.

Fits size: 0-3 mo

Materials
Classic Worsted Tapestry by Universal yarn; you’ll need approx ½ of a 3.5 oz/197 yds/100gm/180 meter skein in Wild Aster, color # 7020


Crochet Hook size I               
Yarn needle

Instructions
Rnd 1: Ch 2, 8 hdc in 2nd ch from hook. Do not ch 1, pm in 1st hdc on each rnd so you’ll know what rnd you are on – 8 hdc
Rnd 2: 2 hdc in each hdc around – 16 hdc
Rnd 3: 1 hdc in 1st hdc, * (2 hdc in next hdc, 1 hdc in next hdc) Cont from * around - 24 hdc
Rnd 4: * 1 hdc in 1st 2 hdc, 2 hdc in next hdc, cont. from * around – 32 hdc
Rnd 5: * 1 hdc in 1st 3 hdc, 2 hdc in next hdc, cont. from * around – 40 hdc
Rnd 6: * 1 hdc in 1st 4 hdc, 2 hdc in next hdc, cont. from * around – 48 hdc
Rnd 7: * 1 hdc in 1st 5 hdc, 2 hdc in next hdc, cont. from * around –
Rnds 8- 14: 1 hdc around, end off. Add more rows to fit baby’s face if needed. (before working earflaps and sc edging) Keep in mind that you will be working 4 more hdc rnds and 1 sc rnd from this point on. 

Earflaps
Fold hat in half so seam is in back Count 7 sts at center of each side and pm at st # 1 and st # 7.
Row 1: Sl st in 1st st at right; hdc in same st and in next 6 sts, turn – 7 hdc
Row 2: Ch 1, hdc in next 7 hdc, turn – 7 hdc
Row 3: Ch 1, hdc2tog in 1st 2 sts (1 dec), hdc in next 3 hdc. Hdc2tog in last 2 hdc, (1 dec) turn – 5 hdc
Row 4: Ch 1, hdc2tog in 1st 2 sts (1 dec), hdc in next hdc. Hdc2tog in last 2 hdc, (1 dec) turn, end off – 3 hdc
Try hat on baby’s head and add or delete rows as needed to fit face. 

Edging
Attach yarn at any st and sc in each hdc around entire edge of hat. 

Braids (optional) Make 3
Cut 8 strands of yarn in 8” lengths. Fold all 8 strands in half, making 16 strands. Braid into desired length, and trim ends. Sew all 3 braids to top of crown from inside of hat, using yarn and yarn needle. Note: I made each braid a different length. Another option would be to sew a braid to bottom edge of earflaps.
Weave in all loose ends. 

Hat fits a life size baby doll too!

Monday, October 8, 2012

Ruffled Scarf - Free Pattern

Ruffled Scarf by Mary Jane Hall
I designed this scarf for Hobby Lobby a few years ago. They asked me to do this so they could use it as one of their tear sheets they give away at the stores. Of course yarn companies do this so people will hopefully use their yarn. Hobby Lobby's line of yarn is called Yarn Bee. Maybe you've seen it or even used it because they have over 500 stores nationwide.

This was a fun time for me as a freelance designer because they'd send me huge boxes of Yarn Bee yarn, which by the way, I love! If you've never used their yarns you would be surprised at how beautiful they are. I noticed that they don't carry quite as much of Yarn Bee they used to, but you won't be disappointed. I just love the yarn I used for this scarf. If you're looking for a yarn with some stretch (as for a garment) this is the perfect yarn, because it actually has some elastic in it!

They carry all the other brands like Bernat, Patons, Lion Brand, Omega nylon, Red Heart, etc and they carry lots of crochet books too. I had fun going through the beautiful yarns and they just let me decide what I wanted to make & what yarn looked best for that project. I believe I did 8 tear sheets for them altogether, which were also a free pattern on their website at one time. Since I've become aware they are no longer showing the patterns online, I decided to go ahead and post them here.

Ruffled  Scarf
Original Design by Mary Jane Hall                                               
 Finished Scarf - Approx. 63" x 4"

MATERIALS
Yarn Bee Paradox yarn in Hot Topics # 32 - 2 1/2 skeins
Crochet hook size K/10 1/2 (6.5mm)
Tapestry Needle

GAUGE
4 dc = 1"
3 dc rows = 1 3/4"

INSTRUCTIONS 
This scarf is worked in rounds, starting with row 2. Row 2 will have 6 dc in each corner
Ch 143
Row 1: 1 dc in 3rd ch from hook  and in each ch across,  turn
Rnd 2: Ch 3 (counts as 1st dc) 5 dc in 1st dc, * 2 dc in next dc, Rep from * across row, 6 dc in last st (do not turn) Continuing around, work 1 dc at end of dc row 1. This will be worked in the side of the dc st. 6 dc in next corner (which will be a ch) 2 dc in each ch st across row, ending with 6 dc in last ch. 1 dc in end st between both sets of dc (between corners) Sl st to top of ch 3 at beginning of rnd.
Rnd 3: Ch 3, dc in same st as joining, * 2 dc in next st , 1 dc in next st, Rep from * around. Join with sl st. End off yarn and weave in all loose ends with tapestry needle.
You can twist the scarf around if you want more of a "boa" effect.

by Mary Jane Hall

Saturday, September 29, 2012

Fishnet Sweater for Adult and Child

Fishnet Sweater in Positively Crochet!
Some people may look at this sweater and say "What? That's not a sweater! It has holes and would never keep anyone warm!"  That's where"trendy" comes in. It's not always practical and may be a little funky. Back when I was sketching design ideas for my first book, Positively Crochet, I was set on doing trendy crochet designs. That was my goal because I knew there was a shortage of trendy designs in books.  I looked at designs from the runway, and found a fur poncho made with an open fishnet pattern. That's where I got my idea for this top. (see photo below)  I originally thought this top would appeal to only teens but I've been surprised that older women like it as well. They want to be trendy too!
I used an extra bulky yarn and tall stitches so you can crochet this in 2 - 3 hours. Using a smaller yarn and smaller hook will result in a child's size. (below)

Open Weave Poncho from the Runway
Use smaller yarn for small top
Magazines tend to have trendier designs because they can get the magazine to the buyer a lot sooner than a book. Also, a design used to be a one time thing - only shown in the magazine. But time has changed with the computer age and publishers are taking advantage of that by selling designs online that have already been published in their magazines. It makes a lot of sense because everyone doesn't buy magazines. Some are now even offering the designer royalties from their online sales, which to me is very fair.
 This pattern is a "top down" project, which makes it easy to fit as you go along. You can add to the length by adding more rows. Another idea would be to weave a wide ribbon through the top row and tie it into a bow!.

Another view of the Fishnet Sweater which is in Positively Crochet! at right. This book contains 50 designs with a huge variety of projects!


Friday, August 31, 2012

Striped Sleeveless Turtleneck Sweater

Turtleneck Top in Crochet That Fits
This has been a very popular pattern in Crochet That Fits.  You may want to wear it in the summer if using a cool yarn, but it would also look great under a jacket in the fall or winter.

It's a beginner project which can be made with or without the turtleneck. Another idea would be to make the collar into a longer cowl. I have loved cowls since they were popular back in the 70's. Or was it the 80's? I don't remember!

 Many people on Ravelry have made this in solid colors and I think they look really sharp. See some photos below. If you go to Ravelry here you can view other projects with this pattern. Once you get to that page, click were it says "42 projects", above the title. You may get some ideas of your own!

Top Design by Mary Jane Hall - project by loopysue on Ravelry
Turtleneck Top Design by Mary Jane Hall - project by Macgillie on Ravelry

Turtleneck Top Design by Mary Jane Hall - project by Zuks on Ravelry


Turtleneck Top Design by Mary Jane Hall - Project by Davana on Ravelry

Monday, December 5, 2011

Snowman Cheese Ball Recipe-Crochet Scarf-Free Pattern!

It's that time of year when we're all looking for new recipes for holiday parties, so I want to share my Snowman Cheese Ball recipe with you. I made a little crochet scarf for him to wear and am posting the EASY pattern. Wouldn't your crochet group think this is the cutest appetizer?

Snowman Cheese Ball
Free Crochet Scarf Pattern. Can also be used for a doll!

Snowman Cheese Ball
Makes 16 servings—2 TB each. I doubled this recipe for the one in the photo.

1 container (8 oz) Cream Cheese)
2 cups shredded cheddar cheese
1/4 cup finely chopped fresh chives or green onions
1/4 cup slivered almonds, toasted
Ground cayenne red pepper to taste
1/4 cup 100% grated Parmesan Cheese
Peppercorns or whole allspice for eyes, mouth and buttons
1 baby carrot for nose (I had to cut it down)
2 stick pretzels for arms

1. Mix cream cheese, cheddar cheese, chives(or green onions) toasted almonds and red pepper untill well blended; cover. Refrigerate 1 hour or overnight
2. Divide mixture into 3 different sized balls (1 small, 1 medium, and 1 large) Coat with Parmesan cheese. Arrange on serving platter in a line to resemble a snowman lying down. Decorate with peppercorns or allspice for eyes, mouth and buttons. Add carrot for the nose. (Note: you could also use raisins or cranberries (cut up) for the buttons, eyes etc).
Place pretzels on snowman for arms
3. Serve with crackers.

(Crochet instructions at bottom of page.)


  Tip: Crochet a little scarf to tie around snowman's neck or cut out a scarf with felt and cut ends for fringe. You can even buy a little black hat at most craft stores.

To make snowman's crochet scarf:
Row 1: With worsted wt yarn and a G or H hook, ch 3, sc in 2nd ch from hook, sc in next ch, ch 1 turn - 2 sc
Row 2 - ???? -Sc in 1st 2 sc, ch 1, turn - 2 sc
Add fringe to ends of scarf
Sorry, I don't remember how many rows I did. I gave the scarf to my grandaughter for her dolls after we ate the snowman!

Sunday, November 13, 2011

3 Designs in Sept 06' Issue of Crochet! Magazine

I started designing crochet wearables in 2005, and had 11 designs accepted by DRG that same year. The following 3 designs were actually not published in the magazine til Sept 06. Publishers already know at least 9 months before the publication date the patterns that will be in the magazine. Most magazines know now (Nov. 11') what designs will be in their holiday issue for 2012. These 3 designs were my first ever in a magazine. I know they aren't big items, but I started out with accessories, then in 2007 I started designing garments like sweaters, shrugs, skirts and tops.

Photo in Crochet! Magazine
Striped Belt and Key Ring Bag in Crochet! Magazine

Friday, October 28, 2011

Two Color Scarf by Mary Jane Hall - Recently Published

I'm excited to share a photo of one of my scarf designs that was recently published in a book called Go Crafty Crochet Accessories. In fact I have 2 scarf designs in this book. The first one is a scarf with small circles, not much bigger than a quarter, called the Two Color Scarf. The second design is a Lavender Flower Scarf with Dark Purple Trim. I will feature that scarf in a separate post. The publisher is Soho Publishing in New York City, which is the same publisher of Vogue Knitting and Knit Simple magazines. They also used to produce Crochet Today! magazine.


Photo from the Book (scroll down to see front cover)
My artist daughter, Jamie Vaduva, did a sketch of a scarf with circles about 5 years ago and this year was the first time I submitted it to anyone. I really liked Jamie's color combination, which was more of a medium green and medium blue. After my submission was accepted, the editor wanted me to do the scarf in the light teal, and lime green, as pictured in the photo above. When she sent me the yarn, I didn't like the color combination at all, but as I made the scarf it started to grow on me. I really do like it now and hope you do too! If you'd like to order this book with 11-12 accessories (scarves, hats, bags, wrist warmers), you can order it at Knit Picks here. Go to Knit Picks homepage to see their beautiful, but inexpensive yarns.

This Accessory book is sold at Knits Picks
Another view of scarf in the book

Sunday, February 20, 2011

Girl's Curlique Scarf - Pattern for Sale


Description - Design by Mary Jane Hall
 This is just a fun scarf for a little girl. I used the Patons Kroy Sock yarn because the colors made me think of crayons. The sides of the scarf are lined with curliques and dangling flowers. It’s a fun project to make. Every little girl will love it and the colors will go with just about any outfit.
You can pay with Paypal or money order. See details below.


Doesn't this scarf look darling on my granddaughters, Chloe and Jade?
  
Skill level – Easy (or Advanced Beginner)
Finished length – Approx. 40”

Materials
1 skein, Patons Kroy Socks - Jacquards
75% Washable wool and 25% Nylon
Color # 55611, Fern Rose Jacquard
1.75oz/50g/166 yds per skein/ball –
(# 1 Super Fine wt)
Crochet Hook Size I/9 (5.5mm)
Yarn needle

Substitutes
Any # 1, super fine sock yarn will work with this pattern

Girls Curlique Scarf - Pattern only