Welcome to my blog!

Welcome Friends! Please be patient while I add more info. I have SO much to share with you. Thanks for visiting!

Wednesday, June 25, 2025

Dill Pickle Tuna Macaroni Salad


Dill Pickle Tuna Pasta Salad
My own creation

You cannot tell from the picture, but there is actually Albacore tuna in this pasta salad. It's similar to my Macaroni Salad, but slightly different. The regular macaroni salad (without tuna) has green pepper and black olives. (Instead of celery and dill pickles). This and my regular macaroni salad may not be anything new to you, but most macaroni salad I've eaten, whether it be at an Amish restaurant or potluck, is almost always sweet. I like those sweet versions too, and if you like a sweet macaroni salad please try my Broccoli Pasta Salad HERE (with bacon). I'm crazy about it!

Dill Pickle Tuna Pasta Salad

Ingredients
1 lb dry macaroni, any shape (I use GF)
2 small can Albacore Tuna, drained
6 hard boiled eggs, grated
1½ cups mayonnaise (Hellmans or Dukes)
1 - 2 Tbs yellow mustard
¾  cup celery, chopped
¾ cup sweet Vidalia onion, chopped
1 cup Baby Dill pickles (whole) chopped
2-3 Tbs cream, only if needed
Salt and pepper to taste

Instructions
  Cook the eggs about 12 minutes; place in cold water and ice. This will make it easier to peel the eggs! Set aside. Boil the macaroni according to pkg directions and drain in a colander. After it has drained (without rinsing) place in very large bowl. I don't rinse the pasta anymore because it makes the salad too runny. Drain the tuna and add to macaroni, breaking up big chunks.
  
  While the macaroni is cooking, chop the celery, sweet onion and pickles. Add to the macaroni after it's been placed in the big bowl. Grate the peeled eggs into the macaroni with a grater. (I don't like big chunks!) Add mayonnaise and mustard. Stir this all together. Taste it and add salt and pepper if you think it needs it.
Add more mayo if needed. If you want it a little more creamy, just add some cream, but not too much. Hope you enjoy it! I am addicted to this, and it's so refreshing for summer on a hot day!

* This main dish Dill Pickle Tuna Pasta Salad is a lot like my Tuna Salad for sandwiches but with added pasta. In my regular tuna salad, though, I add sweet pickles, as well as dill pickles. Everybody asks me for the recipe!

Sunday, May 18, 2025

Crunchy Chicken Casserole - My Favorite!

Crunchy Chicken Casserole
Original casserole published in
Taste of
Home Magazine by Michelle Wise called Hot Chicken Salad

CRUNCHY CHICKEN CASSEROLE     

(My friend, Shirley Siddall gave me this recipe) SERVES 5-6 people

* Note - I half this recipe for 1-2 people

2 cups cooked chicken, diced   

 1 cup celery, diced

½ cup onion, diced

1 can sliced water chestnuts, cut in slivers

¾ cup mayonnaise (Dukes is GF)

1 can cream of chicken soup

1½ - 2 cups cooked rice

½ cup slivered almonds (or more)

1 cup sliced fresh mushrooms  (optional) 

TOPPING - 1½ Tbs butter, 1 cup crushed cornflakes, ½ cup slivered almonds

Cut water chestnuts in strips. Mix first 8 ingredients (+ mushrooms if using) & put in casserole dish. Mix topping ingredients & spread on top. Bake at 350º  30-40 mins.

Enjoy this tasty casserole! Leftovers are great!

Crunchy Chicken Casserole


Wednesday, April 23, 2025

Crochet vs Knitting? Which is Better?

If you're a knitter & trying to decide whether or not you want to learn to crochet, this blog post is for you!. Btw, I can knit myself & love the look of knitting, but would much rather be crocheting, because it's faster & more fun to me. 

Anca Văduva - Anca is my Romanian daughter in law. When she came to the US and married my son, I knew she was a knitter just like her mom. I asked her if she wanted me to teach her how to crochet and her response was "Sure, someday I'd like to learn." Well, 3 years went by and Anca had her first baby. I was going to stay with her about a week, helping with that absolutely beautiful baby girl, Chloe. (Who is now about to turn 21!) I told Anca, "While I'm here, why don't you let me teach you to crochet?" Then she said, "Oh, maybe later. This may not be a good time to learn, with a new baby." Well, I persisted saying this might be the best time while I'm here and it doesn't have to be stressful. Maybe it will relax you like it does so many other people." 

So then she gave in saying "ok". About an hour into it and learning the basic chain, single and double crochet, I told her I wanted to get her started on an easy, quick project such as a dishcloth, pot holder or easy scarf, because people tend to stick with it if they actually make something, as opposed to me leaving them with a long sc or dc row to practice on. But no, not Anca. She's brilliant, by the way, and even knows 5 languages! She said, "No, I want to make a hat, this newsboy cap", after looking at some patterns I'd brought to show her. Not a simple beginner hat that is made from a rectangle and sewn up the side. I tried to discourage her from doing an intermediate project, because, after all, she'd just been practicing the basics for only an hour! A newsboy cap to some people is an advanced project! But she insisted, since I was going to be there a few days, I thought I could help her step by step. As she was working on the hat, she literally jumped up and down, saying "This is SO much fun! Why didn't you teach me this a long time ago?!?" I had to laugh. That did my heart good! Needless to say, she added "Crochet is so much more fun and faster than knitting!" One of the most surprising things that told me she was beyond excited about crochet is that after I went home a few days later, she called me and said she made a matching one for Chloe! Now how many beginner crocheters would be able to do that? To cut down a pattern on her own that had increases and decreases, plus a brim? Amazing! I kept asking her if she already knew how to crochet and she assured me she didn't! She's smart, and still knits occasionally, but I attribute it to the fact she loves crocheting more. 

My daughter in law, Anca, and my sweet little granddaughter, Chloe! The Newsboy Cap was her first ever Crochet Project!

Chloe (now 20) and Anca, 2 of my favorite people in the whole world! I taught Chloe to crochet when she was about 10 and she loves it too!

Opinions from people who both knit and crochet:

https://www.jjcrochet.com/top-8-reason-why-crocheting-is-better-than-knitting/

Crolynne

August 18, 2017

I am casting a vote for crochet. It’s 100x better than knitting, in my opinion. It’s much less strict and more adaptable. Knitting is harder for me because it’s more difficult to go back and fix a mistake and dropped stitch. I learned knitting first (about 2 years ago) and did it exclusively for amost a year before I picked up a crochet hook. Since I went hook, I haven’t really gone back to knitting. I should so I don’t lose my skill, but honestly I find even the thought a chore. I still have a knitting WIP that I want to finish but who knows if/when that will happen. I must admit that I am so surprised to hear that crochet patterns are harder to come by. I thought it would have been the opposite, in that knitting patterns were fewer and farther between.

Chuckles By The Bay

 I  just started crocheting this week. OMG!!!!! It is QUICK! And, it is fun. I am not giving up knitting. But, I am making a granny square blanket right now and I am soooooo darn excited. I never knitted a blanket–it bored me. Granny Squares are NOT boring. They move quickly and it is fun deciding on the next color.


Tuesday, March 11, 2025

Broccoli/Cauliflower/Olive Salad

Broccoli/Cauliflower/Olive Salad (Mary Jane Hall)

My husband used to get this type of salad at the Kroger deli and we really liked it. One day I decided to try and make it myself without really knowing all the ingredients. I'm not sure if I included everything that was in the deli salad, but I loved it from the first day I made it and have been making it for at least 20-25 yrs.

My Own Creation
Broccoli/Cauliflower/Olive Salad

This salad is pretty healthy, with cauliflower, broccoli, sweet onion, black olives, green olives and lots of hard boiled eggs! Sometimes I eat just this for lunch or bedtime snack because it's very satisfying.

Ingredients

*Note: reserve small amount of olive juice (both black & green olives)

3 cups Broccoli, bite size pieces

3 cups Cauliflower, bite size pieces

1 can black olives, drained

1 small jar green olives, drained

½ sweet Vidalia onion, chopped

6 hard boiled eggs

1 cup (or more) mayonnaise - Hellman's is my favorite (not salad dressing)

You will not need salt & pepper, unless you think it needs some

Mix all together, leaving the olives whole. I like to create the boiled eggs but some may like their eggs chopped. I add about a tablespoon each of olive juice. Just go by your taste, bc you may not even need it. 


Sunday, January 12, 2025

How To Line a Crochet or Knit Purse

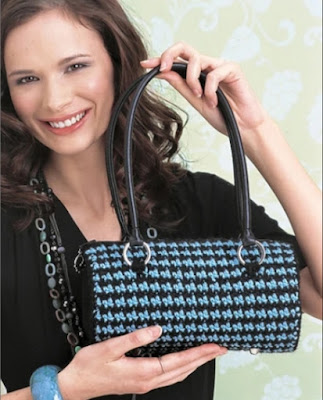
Houndstooth Purse I designed (barrel shape) for Crochet Today magazine (May/June issue 2009)

If you are making a crochet purse or any kind of bag, I have more than one method to show you how to make a lining. Others may do it differently. First, I am showing how I made the lining for the Houndstooth Purse (shown in photo above). Please read through these instructions before purchasing your supplies. 

Another version of my "Barrel" bag at right in all one color. When I submitted my bag design to Crochet Today magazine back in 2008, I submitted it in a black and white Houndstooth Check pattern, but they asked me to make it in the light real and black as in the one at left. Of course they send the yarn to the designer and we don't have to buy it. As you may be able to see, I sewed a zipper into the top (attaching it to the lining) and added a little charm to open and close the bag. The orange bag at right has shorter brown handles I purchased at JoAnn Fabrics and I crocheted a small round piece to open and close the zipper.

First Method

Supplies you'll need:

1. Thick/firm pellon or any other  stabilizer (such as plastic canvas) that's large enough for your purse pieces to be traced on to. All fabric stores such as JoAnns, Hobby Lobby or Hancock Fabrics carries pellon in several different thicknesses. I use this because I want my purses to stand up on their own.

See what pellon looks like at this link. I buy the "extra firm" : Pellon - called interfacing or stabilizer

2. Fabric in a color the same as your bag or a color that contrasts with your crochet pieces. I usually buy 1 yard or less, depending on what size your purse is. You will actually be cutting the fabric  ½" - ¾" larger, around the edges, than your crochet piece and the stabilizer, so you can fold it over the edges of it. See photo below. 

It's fun picking out pretty fabric lining for your crochet purse. I purchased this colorful fabric at JoAnns Fabrics and Crafts

For a Bag That Has Separate Pieces You Need to Crochet or Sew Together

When you are making a purse that has separate pieces, such as a front, back and gusset that will need sewn together later, this is how I make the lining. 

1. You'll need to buy a large piece of  "Pellon", which is a stabilizer or white interfacing in regular sewing projects. (Like what's used for a collar or belt). There are several thicknesses you can purchase, depending on how sturdy you want your bag to be. I almost always buy the thickest pellon (extra firm) I can find because a fabric, knit or crochet purse is really flimsy and I want mine to actually stand up on its on! There's nothing I hate more than a purse that collapses when you sit it on the floor or a table. Using a thick stabilizer will also make your bag look much more professional. Yes, sometimes it's a bother, to take the extra time to line a bag, but it's SO well worth it!  

These are the crochet pieces I made for this particular "barrel" shaped Houndstooth Purse. The way to get the Houndstooth stitch is: on each row, you work "dc, sc" all across the row and then on the next row you work all "sc, dc", working sc into the dc and working dc into each sc. It's easy enough for a beginner but you need to really pay attention!

Step 1: lay the pellon (stabilizer) on a flat, hard surface such as a table or floor. Then lay your crochet piece (such as the gusset or separate front piece) on top of the stabilizer. With a marker, pen or pencil, trace around the crochet piece, being careful not to get marker on your crochet work. These pieces of stabilizer need to be the same size as your crochet pieces. 

Step 2: you will be cutting your fabric the same way as the stabilizer, by tracing it around the pieces, but you will cut the fabric ¾" wider than the stabilizer, all the way around. See photos below.

The white pieces are the stabilizer (pellon) you get at a fabric store and the black is the fabric liner I chose for the Houndstooth Check rounded bag I made that was published in a "Crochet Today" magazine (May/June 2009 issue) several years ago. 

Step 3: after you have all pieces cut out, place the stabilizer onto the back (wrong) side of your fabric. Fold the extra fabric edges around the stabilizer and secure it to the stabilizer either with fabric glue or tape (because it will not show through). They even sell pellon that is sticky on one side, if you prefer buying that. If your crochet pieces are curved, then you'll have to cut little slits into the edge of the fabric to get it to wrap around the pellon or plastic canvas. See photo.

This is showing how to fold the extra ¾" of fabric over - around the edges of the stabilizer, cutting slits into the rounded pieces to easily wrap around it. 

See how I sewed the lining/stabilizer pieces to the crochet pieces, in pictures below. Just place the WRONG side of the lining piece to the WRONG side of your crochet pieces, along the outside edges and sew by hand with a needle and matching thread with a whip stitch. 

This is a bag that Maria Weaber of Maria's Blue Crayon blog has attached a lining to. She's doing it the same way I do by placing the wrong sides of the fabric lining and crochet piece together. I also pin them together with straight pins before hand sewing the lining in. You can sew it on a sewing machine if you wish but I just use a whip stitch to attach it. There are ways to hand sew the lining to the crochet pierce with an "Invisible Stitch", which I do quite often also, especially if I don't want the thread to show. Just look up invisible stitch online or YouTube and you'll find tons of tutorials on how to do that. 

Second Method on How To Line a Crochet Bag

If you are making a round,  square or rectangular crochet purse, that is crocheted into the round into 1 big piece, then this is the way you would make a lining. See pictures of examples below. 

This is also the way I made a lining when my bag is crocheted in the round into one piece. The blog is Future Girl where she has an excellent tutorial. If I find my pictures of my own lining like this, I will post it here also. 

Types of Bags I Have Lined This Way

This is my La Fleur Dolly Bag published in my book, Colorful Crochet Lace, available on Amazon. Since the bag was originally a round doily I designed, it was easy to just cut a round piece of fabric. I did not put a stabilizer in this one.


This is my Double Breasted Jacket Purse in my book, Positively Crochet! 

The Purse/Bag below is one I designed for a book for Beginners by Soho Publishing in NYC


I hope the steps above for my Beaded Bag will help you in learning how to line a bag. You'll notice I attached the pelon in "Step 6" with duct tape. It may not look great, but I knew it wasn't going to show & would be hidden.

The felted Brown Shoulder Bag (above) was published in my book Positively Crochet!, which is still available on Amazon, eBay and other online bookstores.

I designed this Pencil Case that was Published in Crochet Today magazine several Years Ago. You just Crochet a Square Piece and Line it as Described Above. Piece of Cake! So Incredibly Easy for a Beginner!

The above purse was crocheted in 2 pieces! The body of the purse (front, back and sides in 1 piece) and then you crochet a rectangle piece for the bottom of the bag

Tuesday, November 26, 2024

Cheesy Instant Mashed Potatoes

 This will be the easiest potato dish you've ever made! I promise. And it's just as delicious as it is easy and always a big hit no matter what kind of event you take it to or what kind of meat you fix to go with it!

I have never liked instant potatoes. I know they're real potatoes, but I just never liked the way they tasted. Believe me, though, when I tell you, that when you taste these mashed potatoes, you won't be able to tell they are instant! 

One of the best things about this recipe is that you don't have to go to the bother and time it takes to peel the potatoes. Plus I like the fact I don't have to whip the potatoes with my mixer or dirty up more dishes to wash. You do everything in ONE pot! This is very quick to make! At the most 15 minutes to heat the water and mix all the ingredients in. 

Cheesy Instant Mashed Potatoes

In the 80's, there was a senior citizens group at our church, called "Super Sixties" that gathered together once a week to visit and eat. There was always entertainment and a Bible study ready for them to enjoy. Occasionally, since I was the ministers wife,  I would help the ladies in the kitchen prepare the meal. They are the ones who taught me how to make these super easy mashed potatoes. An idea, is if you're going to take this to a potluck or dinner at someone else's house, would be to make a big batch and keep it warm in the crockpot. I think this could easily be baked in a dish if you want to do it that way. If you do that though, you'll need to add more milk and butter so it won't get too dry.

Instant Cheesy Mashed Potatoes         4-6 Servings

Note: to feed a larger group of people, double or triple this recipe. If I were making it for a potluck, Thanksgiving or Christmas dinner, I would triple or quadruple this and keep it warm in my crockpot.

2 cups instant potatoes
1¾ cups water
3 Tablespoons butter
¾ teaspoon salt
1 cup milk
---------------------------------------
2/3 cup sour cream
1 cup shredded cheese (Velveeta, Colby or cheddar). I use Velveeta.
2 Tablespoons Hellman's mayonnaise
1/3 pkt Hidden Valley Ranch dry mix  (OR makes your own with: (add to taste)
Dill weed
Onion powder
Garlic powder
Fresh or dry parsley

Directions
Cook potatoes in saucepan on top of stove, according to directions using first 5 ingredients.
After potatoes are done, add rest of the ingredients and mix thoroughly.  You can add more of all these ingredients if you think it needs more or to your taste.

I hope you enjoy this recipe! If you want a quick potato salad, use instant potatoes for that too! Just add the ingredients you normally would for a regular potato salad. My friend, Jean Parker, from Midland, Texas taught me how to do this and it's great!

Instant Potato Salad - Texas Style
(add everything to your taste)

Instant potatoes (any amount already prepared, as on the package)

Add the following to your taste:

Sweet onions, chopped

Celery, chopped

Sweet Pickles, chopped

Dill Pickles, chopped

Hard Boiled Eggs, grated (cook number of eggs you think you'll grate into the salad, plus 1 more egg to slice on top

Mayonnaise (I like Hellman's best)

Mustard, to your taste

Salt and Pepper to taste

Green Olives, sliced

If you want to give it a little more taste, add some of the dill pickle / sweet pickle juice from the jar. Not too much. You dont want your potato salad to be runny!
I always put sliced hard boiled eggs and sliced green olives on top and sprinkle with Paprika


Tuesday, November 12, 2024

Tips on Teaching Someone to Crochet

My freshman year in College is when I learned to crochet. If someone tells me they tried to learn or someone else tried to teach them, but they just couldn't catch on or didn't stick with it, I'll ask them how old they were because, I know from experience and teaching lots of others to crochet, you really have to have a desire to do it.  Many people I know learned when they were 5. Maybe they did have a desire to learn but there's another factor. I've been in lots of groups where I or others have taught numerous kids and older people to crochet. I just came to this conclusion on my own. 

Beginner Crochet Purse / Bag  My Granddaughter Made at Age 12

My Thoughts On Keeping Them Motivated

Many grandmothers or anyone who teaches someone to crochet will teach the child (or grown-up) to do a chain and send them home to practice. I've even heard some say when they were young they made a chain the whole length of the house! And most of the time when someone teaches a child, they will help them start a potholder or something small they're not really excited about. SO,  I decided I'd start finding out some of the things they'd LIKE to make. Some may tell you they want to make something that is not a beginner project but  more advanced. I talk to them til we come to an agreement of something they're interested in that's for a beginner. For instance, if someone who just learned wants to make a purse, most teachers would say no, that that's too advanced for a beginner. Well, I had my 12 yr old granddaughter, Chloe, make a purse, but it was a very easy purse! It was basically a long rectangle which became the front and back of the purse, by folding it over. I can't remember if I had her do single crochet rows or whether they are half double crochet or double crochet, which goes faster. It's no harder than a single crochet-you just wrap the yarn around the hook before putting it into the stitch and this makes the stitch taller, so it's easy. 

Another Suggestion

Helping a beginner to do little things, will help them not feel as overwhelmed. 

I also helped her by making a flap to fold over and then she crocheted the long shoulder strap she wanted. I also helped her make tassels to put on the bottom but I let her design the whole purse by choosing the yarn and telling me exactly how she wanted it to look. I think I made a small flower to put on the front too, knowing she'd eventually learn to do a flower. But I knew the things I did to help wouldn't discourage her from crocheting & when she saw how cute it was when finished, it made her want to make more things. Since then, she's made scarves, bracelets and helped her mom crochet an Afghan. She's in college now and has even started a crochet group among her friends who either already knew how to crochet or wanted to learn. I have given her tons of yarn and lots of crochet books with easy projects to share with her friends. I also gave her about 25 crochet hooks in different sizes to share with friends. I collect crochet hooks and had over 100 of them!

But my point is that when they make something they're excited about and can actually SEE the results, they are much more likely to stick with it! But also helping them by making a flower or sewing the bag together for them, while they watch, gets them excited they'll actually be able to carry the purse and show their friends what they did. 

Another motivation for beginners is showing them small projects they can make as gifts for friends and family. Some suggestions for gifts that are quick would be:

Bookmark

Keychain

Hair accessories

Coin Purse

Cell Phone Case

Water Bottle Carrier

Coffee Cozy

Bracelet, Necklace, Ring or Earrings

Doll Clothes

Scarf or Cowl

Eye Glasses Holder

Pencil Case

You could probably think of 100's more small projects! And there are 1,000's of free patterns on the internet.